Preserving your Breastmilk using Everlast Dust
And Casting a hair, cremation, or other inclusion keepsake directions
If you are creating a non-breastmilk keepsake, please skip over the breastmilk preservation instructions, and scroll down to “Casting your Resin Keepsake”.
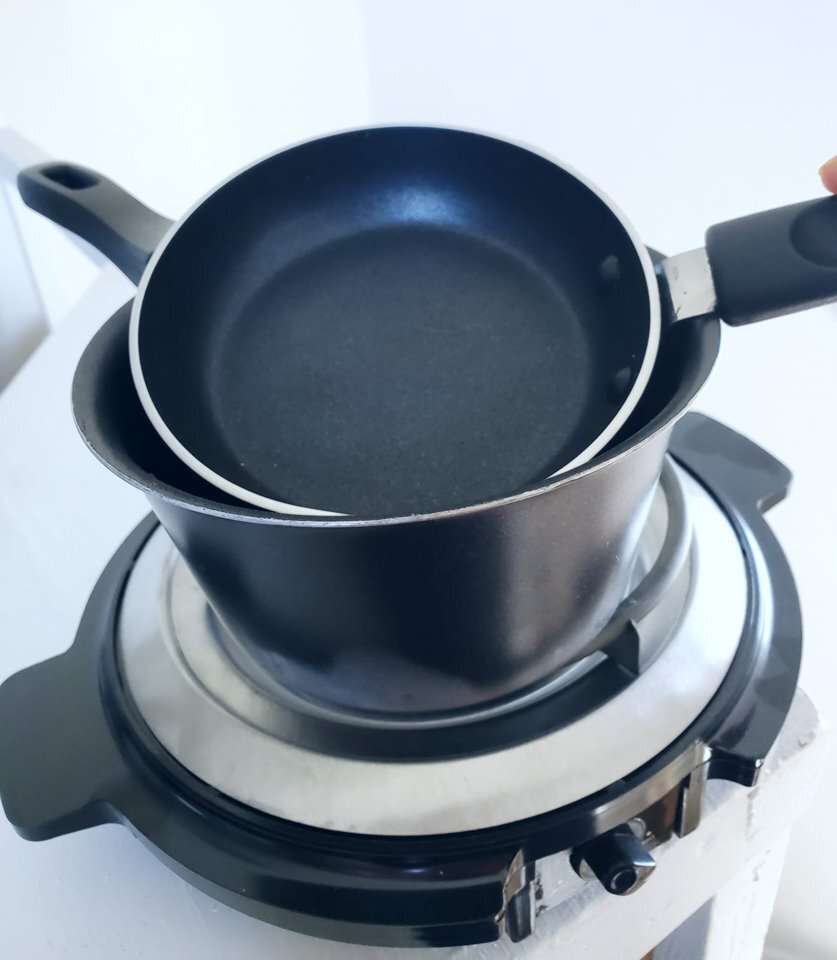
Kristen’s personal setup. A small fry pan, over a small saucepan, on an electric burner.
Have your Everlast Dust ready to go!
STEP 1
First step, get your station ready. Make sure you have a double boiler, or a double boiler setup, a small square of parchment paper, your packet of Everlast Dust, and a tool. A small spoon, Popsicle stick, or small cosmetic spatula will be fine.
I personally use a small saucepan, topped with a small fry pan. It is important to use a double boiler method. Putting breastmilk directly on a heating element may scorch or burn your breastmilk, which will destroy your sample.
Make sure everything is clean and ready to go. Once you have everything situated, fill up the saucepan underneath with a few inches of water. Do not overfill. Turn the heat on medium high.
have your parchment paper, Everlast Dust, and tool ready to go in arms reach.
YOUR SETUP WILL GET HOT! Always use caution when working with a stove top.

It is important to measure out exactly 5mls like pictured.
Step 2
While your water is heating up, carefully measure your liquid raw breastmilk. Each packet of Everlast Dust is carefully measured to work with exactly 5ml of liquid breastmilk.
A plastic syringe makes it especially easy to measure our exactly 5mls of your breastmilk. If more or less breastmilk is measured, the breastmilk will not preserve properly.
Once you have your breastmilk carefully measured out to 5mls, carefully set it aside until the water in your double boiler system comes to a boil.

Step 3
Once the water in your double boiler system has come to a boil, add all 5mls of your pre-measured raw liquid breastmilk into the top pan.
Be careful, your breastmilk will get hot.

You can see the heat bubbles around the outside edges of the breastmilk
Step 4
This step can take a few minutes. Some breastmilk heats faster than others. Stir while it is heating up.
The key thing to look for is your breastmilk is bubbling lightly around the edges, and a bit of “milk film” may appear.
It is very important to heat up your breastmilk, as it kills bacteria, stabilized the breastmilk, and helps it to absorb the Everlast Dust.

Everlast Dust has been added
Step 5
Once your Breastmilk is heated and ready, empty ALL the contents of your Everlast Dust packet directly into your breastmilk. Start stirring it in right away.
At this point, you can turn the heat down to low.
Be careful, everything is still hot!

Step 6
Immediately after you add the Everlast Dust directly into your breastmilk, start mixing it in. Scrape the bottom and all around to get it mixed together well.
You should start seeing your breastmilk change almost immediately.

Step 7
Please keep in mind, that all breastmilks are different. Some breastmilks are more watery, others contain more amazing fats.
Some breastmilks may take a bit longer on the heat than others. If you add Everlast dust to your breastmilk and it looks like melted frosting (a bit more liquidy) keep stirring your breastmilk over the heat. Keep stirring it over the heat until it thickens and turns into more of a porcelain clay texture.
Other breastmilks firm up quickly and may have a more chunky “play dough” consistency. BOTH are normal.
Turn off your heat completely.

Step 8
Spread your breastmilk “dough” thinly onto your sheet of parchment paper. The thinner the better.
Let sit at room temperature for 18-24 hours. Make sure it is in a safe place, but no place air tight just yet, as the moisture needs to evaporate.
Grinding your Breastmilk
Please follow these steps completely. Doing so, will ensure your preserved breastmilk will be transformed into a workable form, to infuse into resin.

Step 1
Make sure that you have a good mortar and pestle set. It is the best way to get your preserved breastmilk, transformed into the ultra fine, baby-powder consistency that is needed.
I recommend a white stone or marble set. Wood or metal mortar and pestles may discolor your breastmilk powder.

Step 2
After allowing your breastmilk to sit out and dry for 18-24 hours after preservation, you are now ready to start the grinding process.
Peel off the breastmilk from the parchment paper, and crush into small pieces. You can do this with your fingers. Feel free to use gloves if you wish.
At this point, there is still trace amounts of moisture inside your breastmilk, Breaking it up helps the moisture to release.

Breastmilk during the first grinding session.
Step 3
Once you have broken your breastmilk into smaller pieces, place a few pinchfuls into your mortar and pestle. It is important to grind small amounts at a time.
In a circular and digging motion, grind your breastmilk.
This step can take some time. It normally takes me about 15-25 minutes to grind breastmilk in this step.
Its important to get the breastmilk as ground as possible, to help the remaining moisture to release.

Step 4
Once your breastmilk has undergone the first grinding, place it on a fresh sheet of parchment paper. Put somewhere safe to air dry for another 24-48 hours (longer if you are in a humid area). It is important to let it dry the full length of time, as it moisture with resin is NOT a good thing.
*At the end of 24-48 hours additional drying time, you can infuse it within resin, and it will give a “chunkier” breastmilk look.
If you wish for a more smooth and opaque look, follow the remaining steps.

Step 5
After 24-48 hours from your last grinding session, the moisture will have released further, and you are now ready to grind your breastmilk powder once again.
With firm circular and digging motions, grind your breastmilk powder in small amounts for another 15-25 minutes, or for as long as it takes.

Finished Breastmilk powder
Step 6
After your second grinding session, your breastmilk powder should be at a baby powder consistency, and is ready to be infused and cast into your precious keepsake!
If you wish, you may leave it out for another 24 hours, and do one more grinding if desired before infusing it. The more you grind, the more opaque and less “chunky” your keepsake will be.
Keep in mind that it is perfectly normal for small speckles of breastmilk to be visable in each finished piece, no matter how much it is ground. Each breastmilk is perfectly unique and beautiful!
IT IS IMPORTANT TO STORE YOUR PRESERVED BREASTMILK POWDER IN AN AIRTIGHT CONTAINER, AWAY FROM SUNLIGHT!
Casting your Resin Keepsake

Step 1
Lay out all the supplies you will need. Make sure everything is clean and ready to go. Double check the cavity of your mold to make sure no dust landed on the inside.
It makes everything run smoothly if you have everything prepped and ready to go.

Don’t forget your safety equipment! This is also a good time to review the Resin safety and precautions, both on the card, and on the website link provided in your kit.
After reviewing the safety and cautions, glove up, place on eyewear (if desired) and put on your mask. Safety first!

Resin Part A and Resin Part B, all measured out and ready to mix.
Step 2
Take your measuring cups, and measure out EQUAL parts Resin A and Resin part B. For example, if you measure out 2.5mls of resin part A, ALSO measure out 2.5mls of Resin part B.
It is important to measure as accurately as possible. Many artists like to use a gram scale, however, the measuring cup method works well. If you need guidance, feel free to mark your measuring cup with a permanent marker.

Step 3
Pour the entire contents of one measuring cup, into the next. Using EcoPoxy, part A has a thicker consistency, so I like to pour the more "fluid” part B into Part A, but its a personal preference.
Be sure to scrape the measuring cup to make sure you get as much possible. Remember, they are EQUAL parts ratio, or 1:1 ratio. It needs to be as accurate as possible, or the resin will not cure properly.

Step 4
Gently mix Resin part A and Resin part B together. Don’t forget to scrape the bottom and the sides to marry the two together well.
Mix and fold and scrape the sides of the measuring cup gently for 3-5 minutes.


While mixing, bubbles can and will occur. When you have completed your mixing, let your resin sit for 2-3 minutes. A majority of the bubbles will self-release, or migrate to the surface. Take a lighter, (BE CAREFUL!) and quickly run the flame over the surface of your resin. This will pop the lingering surface bubbles.
* Extra step if desired *
Feel free to transfer the mixed resin into another container. This ensures there are no pockets of unmixed resin around the edges. Its not NEEDED, but its just an extra precautionary step that I personally take.
If there are little pockets of unmixed resin, your keepsake may not sure properly.
Shown pictured with a reusable silicone mixing cup.

Step 5
Ready your prepared inclusion. For this example, I am using breastmilk that has been preserved using Everlast Dust.
If you are using a different prepared inclusion such as cremation ash, or sand for example, follow the same steps. Add in your embellishments or inclusions whenever this tutorial says to add the breastmilk powder.

Step 6
When working with inclusions, embellishments, and pigments in resin, it’s important to remember that a little goes a LONG way! Add toothpick sized amounts of your inclusion, pigment, or sparkles to your resin mixture at a time.
Fully incorporate your add each time, to determine if you will need more. Add little bits at a time, until your desired look is achieved.

You can see the beautiful creamy breastmilk powder melting into the resin here.
You can research various resin crafting technics on YouTube, if desired.

Step 7
Once you have added enough of your inclusion, pigment, or sparkle add to your desired look, take your mixing spatula and blend well. Crush any larger “chunks” between the spatula and the sides of your cup.

Your inclusion infused resin is now ready to cast! Feel free to run your lighter over the surface to pop new surface bubbles.
PRO TIP: If your inclusion or breastmilk powder has particularly larger chunks, and you do not want a chunkier look, let your inclusion infused resin sit for 2-3 minutes, and the heavier pieces will sink to the bottom. Remove the inclusion infused resin closer to the surface, it will have less chunky bits.

Step 8
Inspect the inside of your mold cavities one last time. Pesky dust particulates can be present in even the cleanliest of spaces!

Step 9
Carefully fill your mold, molds, or bezels with your inclusion infused resin!
Remember to fill little bit by little bit. I use the drop off a toothpick repeatedly, until the cavity is full. Feel free to run your lighter quickly over the top of the resin in your mold, to help pop bubbles.
It is very important NOT to overfill! Overfilling has the potential to make a huge mess, and destroy your project <3

Step 10
Place your filled mold, or bezel in a dry and covered area for at least 24 hours.
I know it’s tempting, but do NOT touch or move your mold or bezel while the resin is curing. This may cause irregularities in your keepsake.

Step 11
Your keepsakes are now ready to be demolded! Remove your keepsake from the mold, sand if needed, and affix any findings (for glue on findings, use a strong jewelry adhesive, or more resin)
Enjoy the tangible memory you can now hold!
To learn resin more crafting Technics, please refer to YouTube, it has a wealth of knowledge!